
These Android AlertDialog.Builder example codes are some of the most common UI element or widget that we use with any Android app. In general, an AlertDialog is a small window that appears in front of your application. It gets the screen focus and able to accept user interaction.
Dialogs are normally used for notifications that should interrupt the user and to perform short tasks.
In this post, we are going to take a look at some common types of AlertDialog I use during Android development. We will cover how to show an Android AlertDialog – from basic to a little complex type.
We will cover the following topics or contents:
1.0 Demo Video
2.0 How to run one of the examples?
3.0 Android AlertDialog Examples
3.1 Android AlertDialog with OK Button
3.2 Android AlertDialog with OK and Cancel Button
3.3 Android AlertDialog with Three Buttons
3.4 Android AlertDialog with Time Picker
3.5 Android AlertDialog with Date Picker
3.6 Android AlertDialog with ListView
3.7 Android AlertDialog with ScrollView
3.8 Android AlertDialog with EditText
3.9 Android AlertDialog with WebView
3.10 Android AlertDialog with Customized Layout
3.11 Android AlertDialog with Single Choice
3.12 Android AlertDialog with Multiple Choices
3.13 AlertDialog with EditText and Soft-Keyboard Shown Automatically
3.14 Persistent AlertDialog
4.0 Tips and Suggestions
5.0 Links and Literature
5.1 Source Code Downloads
5.2 Android AlertDialog Online Resources
5.3 The Code of a Ninja Resources
1.0 Android AlertDialog.Builder Example – Demo Video
First, I want you to see what will be the final output of our code for today. Here’s a video demo I shoot for you guys.
2.0 How to run one of the examples?
Here’s a very simple code to run one of the example methods.
package com.example.alertdialogoneexample;

import android.os.Bundle;
import android.app.Activity;
import android.app.AlertDialog;
import android.content.DialogInterface;

public class MainActivity extends Activity {

    @Override
    protected void onCreate(Bundle savedInstanceState) {
        super.onCreate(savedInstanceState);
        setContentView(R.layout.activity_main);

        alertOneButton();

    }

    /*
     * AlertDialog with one action button.
     */
    public void alertOneButton() {

        new AlertDialog.Builder(MainActivity.this)
                .setTitle("One Button")
                .setMessage("Thanks for visiting The Code of a Ninja - codeofaninja.com")
                .setPositiveButton("OK", new DialogInterface.OnClickListener() {
                    public void onClick(DialogInterface dialog, int id) {

                        dialog.cancel();
                    }
                }).show();
    }

}
When you run the code above, it will look like this…

On the following examples – numbers 3.0 to 16.0, the presentation will look like this: Code and then output.
3.0 List of Android AlertDialog.Builder Example Codes and Screenshots
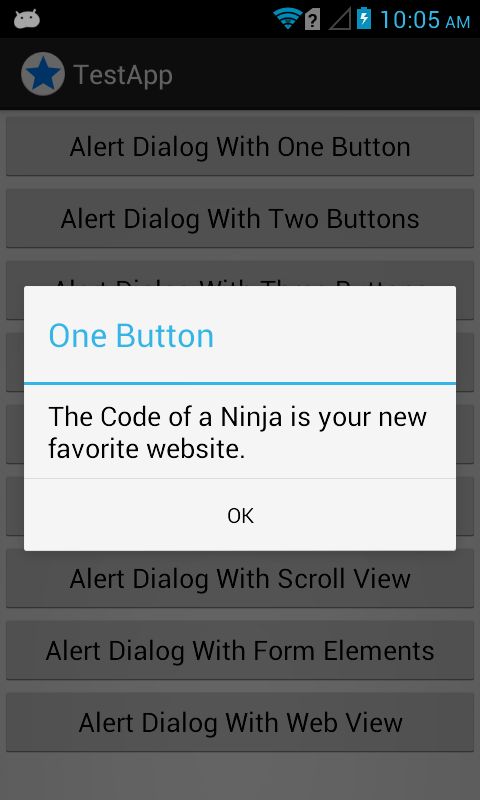
3.1 Android AlertDialog with OK Button
You can always change the button’s label by changing setPositiveButton’s first parameter, from “OK” to whatever characters or label you want. By the way, showToast() is another method I used to show a temporary or short lived message prompt to the user.
/*
 * AlertDialog with one button.
 */
public void alertOneButton() {

    new AlertDialog.Builder(MainActivity.this)
            .setTitle("One Button")
            .setMessage("The Code of a Ninja is your new favorite website.")
            .setPositiveButton("OK", new DialogInterface.OnClickListener() {
                public void onClick(DialogInterface dialog, int id) {
                    showToast("Thank you!");
                    dialog.cancel();
                }
            }).show();
}
Output:
3.2 Android AlertDialog OK Cancel Example
The ninja icon was set using the setIcon() with image from the project’s drawable resource.
/*
 * AlertDialog with two button choices.
 *
 * We also set the ninja icon here.
 */
public void alertTwoButtons() {
    new AlertDialog.Builder(MainActivity.this)
            .setTitle("Two Buttons")
            .setMessage("Do you think Mike is awesome?")
            .setIcon(R.drawable.ninja)
            .setPositiveButton("YES",
                    new DialogInterface.OnClickListener() {
                        @TargetApi(11)
                        public void onClick(DialogInterface dialog, int id) {
                            showToast("Thank you! You're awesome too!");
                            dialog.cancel();
                        }
                    })
            .setNegativeButton("NO", new DialogInterface.OnClickListener() {
                @TargetApi(11)
                public void onClick(DialogInterface dialog, int id) {
                    showToast("Mike is not awesome for you. :(");
                    dialog.cancel();
                }
            }).show();
}
Output:

3.3 Android AlertDialog with Three Buttons
As you can see, the positive button is located on the left side. The neutral button is always in the center and the negative button is in the right side
/*
 * AlertDialog with three button choices.
 *
 * We also set the ninja icon here.
 */
public void alertThreeButtons() {
    new AlertDialog.Builder(MainActivity.this)
            .setTitle("Three Buttons")
            .setMessage("Where do you want to go?")
            .setIcon(R.drawable.ninja)
            .setPositiveButton("RIGHT",
                    new DialogInterface.OnClickListener() {
                        @TargetApi(11)
                        public void onClick(DialogInterface dialog, int id) {
                            showToast("You want to go to the RIGHT.");

                            dialog.cancel();
                        }
                    })
            .setNeutralButton("CENTER",
                    new DialogInterface.OnClickListener() {
                        @TargetApi(11)
                        public void onClick(DialogInterface dialog, int id) {
                            showToast("You want to go to the CENTER.");
                            dialog.cancel();
                        }
                    })
            .setNegativeButton("LEFT",
                    new DialogInterface.OnClickListener() {
                        @TargetApi(11)
                        public void onClick(DialogInterface dialog, int id) {
                            showToast("You want to go to the LEFT.");
                            dialog.cancel();
                        }
                    }).show();
}
Output:

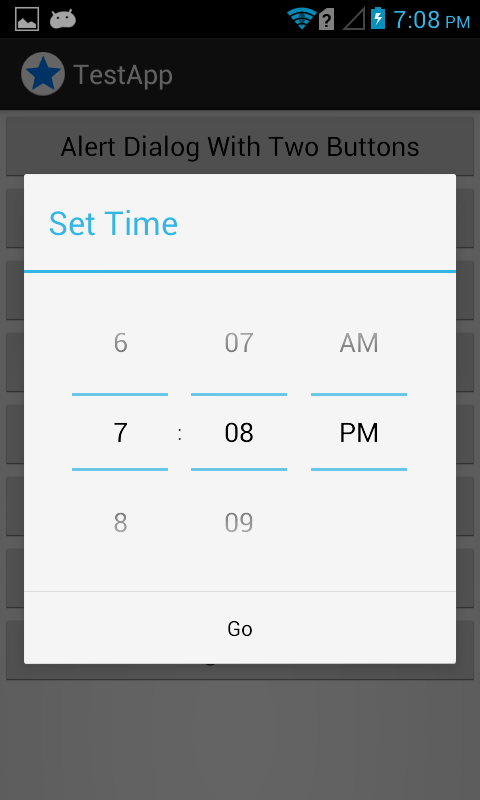
3.4 Android AlertDialog with TimePicker
The TimePicker in our example were inflated from a layout resource. You can also do this programatically but I recommend using an XML layout resource so your TimePicker can be reused and easily themed.
/*
 * Show AlertDialog with time picker.
 */
public void alertTimePicker() {

    /*
     * Inflate the XML view. activity_main is in res/layout/time_picker.xml
     */
    LayoutInflater inflater = (LayoutInflater) getSystemService(Context.LAYOUT_INFLATER_SERVICE);
    View view = inflater.inflate(R.layout.time_picker, null, false);

    // the time picker on the alert dialog, this is how to get the value
    final TimePicker myTimePicker = (TimePicker) view
            .findViewById(R.id.myTimePicker);

    /*
     * To remove option for AM/PM, add the following line:
     *
     * operatingHoursTimePicker.setIs24HourView(true);
     */

    // the alert dialog
    new AlertDialog.Builder(MainActivity.this).setView(view)
            .setTitle("Set Time")
            .setPositiveButton("Go", new DialogInterface.OnClickListener() {
                @TargetApi(11)
                public void onClick(DialogInterface dialog, int id) {

                    String currentHourText = myTimePicker.getCurrentHour()
                            .toString();

                    String currentMinuteText = myTimePicker
                            .getCurrentMinute().toString();

                    // We cannot get AM/PM value since the returning value
                    // will always be in 24-hour format.

                    showToast(currentHourText + ":" + currentMinuteText);

                    dialog.cancel();

                }

            }).show();
}
res/layout/time_picker.xml
<?xml version="1.0" encoding="utf-8"?>
<TimePicker xmlns:android="http://schemas.android.com/apk/res/android"
    android:id="@+id/myTimePicker"
    android:layout_width="match_parent"
    android:layout_height="match_parent" >

</TimePicker>
Output:
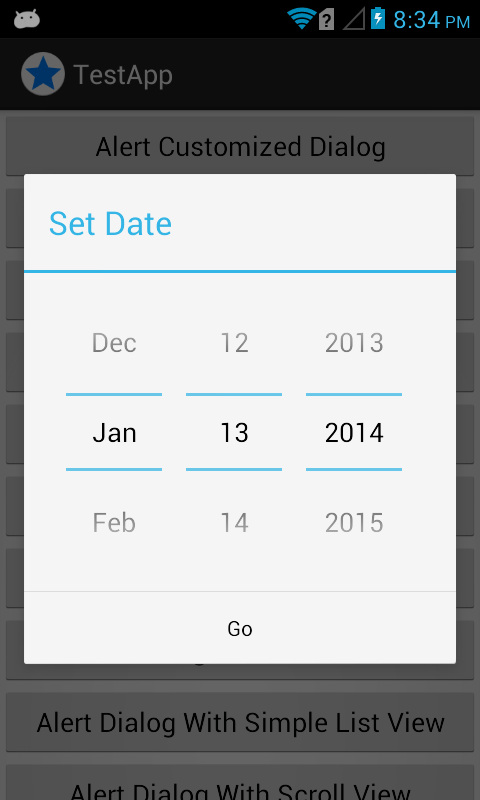
3.5 Android AlertDialog with DatePicker
Keep in mind that we’re using a DatePicker XML layout resource here, we called it date_picker.xml, code were also provided below.
/*
 * Show AlertDialog with date picker.
 */
public void alertDatePicker() {

    /*
     * Inflate the XML view. activity_main is in res/layout/date_picker.xml
     */
    LayoutInflater inflater = (LayoutInflater) getSystemService(Context.LAYOUT_INFLATER_SERVICE);
    View view = inflater.inflate(R.layout.date_picker, null, false);

    // the time picker on the alert dialog, this is how to get the value
    final DatePicker myDatePicker = (DatePicker) view.findViewById(R.id.myDatePicker);

    // so that the calendar view won't appear
    myDatePicker.setCalendarViewShown(false);

    // the alert dialog
    new AlertDialog.Builder(MainActivity.this).setView(view)
            .setTitle("Set Date")
            .setPositiveButton("Go", new DialogInterface.OnClickListener() {
                @TargetApi(11)
                public void onClick(DialogInterface dialog, int id) {

                    /*
                     * In the docs of the calendar class, January = 0, so we
                     * have to add 1 for getting correct month.
                     * http://goo.gl/9ywsj
                     */
                    int month = myDatePicker.getMonth() + 1;
                    int day = myDatePicker.getDayOfMonth();
                    int year = myDatePicker.getYear();

                    showToast(month + "/" + day + "/" + year);

                    dialog.cancel();

                }

            }).show();
}
res/layout/date_picker.xml code
<DatePicker xmlns:android="http://schemas.android.com/apk/res/android"
    android:id="@+id/myDatePicker"
    android:layout_width="wrap_content"
    android:layout_height="wrap_content" />
Output:

Not looking good right? The view above is suitable for tablets only and not for phone screens, so we have to disable the calendar view using DatePicker’s setCalendarViewShown() method. Here’s something better for smartphones.
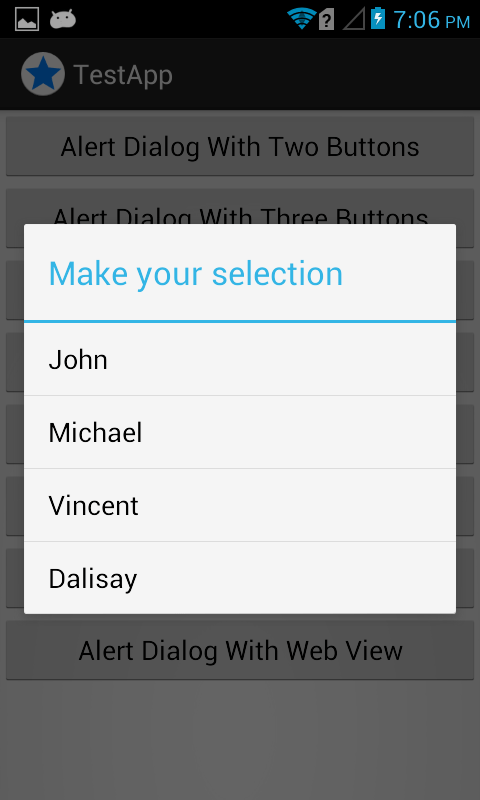
3.6 AlertDialog With Simple ListView
You can add or remove items inside the CharSequence[] items. You can set the actions inside the onClick(), with the help of if-else statement.
/*
 * Show AlertDialog with a simple list view.
 *
 * No XML needed.
 */
public void alertSimpleListView() {

    /*
     * WebView is created programatically here.
     *
     * @Here are the list of items to be shown in the list
     */
    final CharSequence[] items = { "John", "Michael", "Vincent", "Dalisay" };

    AlertDialog.Builder builder = new AlertDialog.Builder(MainActivity.this);
    builder.setTitle("Make your selection");
    builder.setItems(items, new DialogInterface.OnClickListener() {
        public void onClick(DialogInterface dialog, int item) {

            // will toast your selection
            showToast("Name: " + items[item]);
            dialog.dismiss();

        }
    }).show();
}
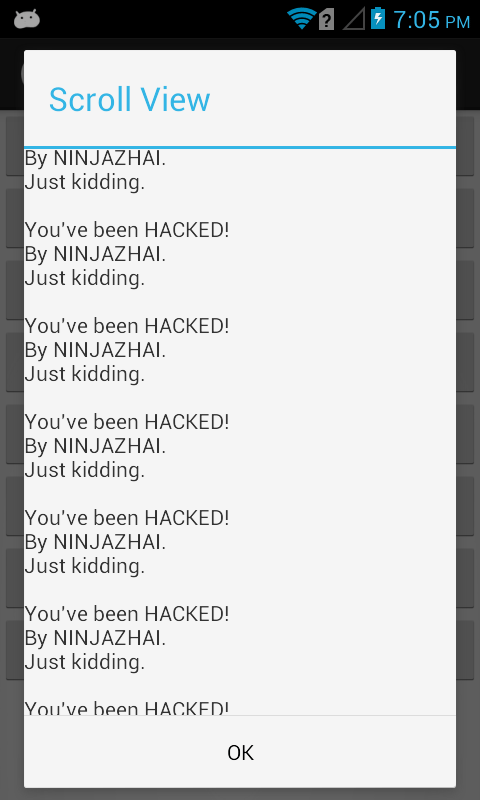
3.7 AlertDialog With ScrollView
It can be achieved using the code below with an XML layout resource with a TextView wrapped inside a ScrollView widge. See scroll_text.xml code also provided below.
/*
 * Show AlertDialog with ScrollView.
 *
 * We use a TextView as ScrollView's child/host
 */
public void alertScrollView() {

    /*
     * Inflate the XML view.
     *
     * @activity_main is in res/layout/scroll_text.xml
     */
    LayoutInflater inflater = (LayoutInflater) getSystemService(Context.LAYOUT_INFLATER_SERVICE);
    View myScrollView = inflater.inflate(R.layout.scroll_text, null, false);

    // textViewWithScroll is the name of our TextView on scroll_text.xml
    TextView tv = (TextView) myScrollView
            .findViewById(R.id.textViewWithScroll);

    // Initializing a blank textview so that we can just append a text later
    tv.setText("");

    /*
     * Display the text 10 times so that it will exceed the device screen
     * height and be able to scroll
     */
    for (int x = 1; x < 50; x++) {
        tv.append("You've been HACKED!\n");
        tv.append("By NINJAZHAI.\n");
        tv.append("Just kidding.\n\n");
    }

    new AlertDialog.Builder(MainActivity.this).setView(myScrollView)
            .setTitle("Scroll View")
            .setPositiveButton("OK", new DialogInterface.OnClickListener() {
                @TargetApi(11)
                public void onClick(DialogInterface dialog, int id) {
                    dialog.cancel();
                }

            }).show();

}
res/layout/scroll_text.xml code
<ScrollView xmlns:android="http://schemas.android.com/apk/res/android"
    android:id="@+id/scrollView1"
    android:layout_width="fill_parent"
    android:layout_height="fill_parent" >

    <TextView
        android:id="@+id/textViewWithScroll"
        android:layout_width="match_parent"
        android:layout_height="match_parent"
        android:text="" />

</ScrollView>
Output:
3.8 Android AlertDialog EditText, etc.
We also inflated an XML layout resource called form_elements.xml, code were also provided below.
/*
 * Show AlertDialog with some form elements.
 */
public void alertFormElements() {

    /*
     * Inflate the XML view. activity_main is in
     * res/layout/form_elements.xml
     */
    LayoutInflater inflater = (LayoutInflater) getSystemService(Context.LAYOUT_INFLATER_SERVICE);
    final View formElementsView = inflater.inflate(R.layout.form_elements,
            null, false);

    // You have to list down your form elements
    final CheckBox myCheckBox = (CheckBox) formElementsView
            .findViewById(R.id.myCheckBox);

    final RadioGroup genderRadioGroup = (RadioGroup) formElementsView
            .findViewById(R.id.genderRadioGroup);

    final EditText nameEditText = (EditText) formElementsView
            .findViewById(R.id.nameEditText);

    // the alert dialog
    new AlertDialog.Builder(MainActivity.this).setView(formElementsView)
            .setTitle("Form Elements")
            .setPositiveButton("OK", new DialogInterface.OnClickListener() {
                @TargetApi(11)
                public void onClick(DialogInterface dialog, int id) {

                    String toastString = "";

                    /*
                     * Detecting whether the checkbox is checked or not.
                     */
                    if (myCheckBox.isChecked()) {
                        toastString += "Happy is checked!\n";
                    } else {
                        toastString += "Happy IS NOT checked.\n";
                    }

                    /*
                     * Getting the value of selected RadioButton.
                     */
                    // get selected radio button from radioGroup
                    int selectedId = genderRadioGroup
                            .getCheckedRadioButtonId();

                    // find the radiobutton by returned id
                    RadioButton selectedRadioButton = (RadioButton) formElementsView
                            .findViewById(selectedId);

                    toastString += "Selected radio button is: "
                            + selectedRadioButton.getText() + "!\n";

                    /*
                     * Getting the value of an EditText.
                     */
                    toastString += "Name is: " + nameEditText.getText()
                            + "!\n";

                    showToast(toastString);

                    dialog.cancel();
                }

            }).show();
}
res/layout/form_elements.xml
<RelativeLayout xmlns:android="http://schemas.android.com/apk/res/android"
    android:layout_width="fill_parent"
    android:layout_height="fill_parent" >

    <CheckBox
        android:id="@+id/myCheckBox"
        android:layout_width="wrap_content"
        android:layout_height="wrap_content"
        android:layout_alignParentLeft="true"
        android:layout_alignParentTop="true"
        android:text="Happy?" />

    <RadioGroup
        android:id="@+id/genderRadioGroup"
        android:layout_width="wrap_content"
        android:layout_height="wrap_content"
        android:layout_below="@+id/myCheckBox" >


        <RadioButton
            android:id="@+id/maleRadioButton"
            android:layout_width="wrap_content"
            android:layout_height="wrap_content"
            android:layout_alignParentLeft="true"
            android:text="Male" />


        <RadioButton
            android:id="@+id/femaleRadioButton"
            android:layout_width="wrap_content"
            android:layout_height="wrap_content"
            android:layout_alignParentLeft="true"
            android:layout_below="@+id/maleRadioButton"
            android:text="Female" />

    </RadioGroup>

    <EditText
        android:id="@+id/nameEditText"
        android:layout_width="wrap_content"
        android:layout_height="wrap_content"
        android:layout_alignParentLeft="true"
        android:layout_below="@+id/genderRadioGroup"
        android:ems="10"
        android:hint="Type your name here..." >

        <requestFocus />
    </EditText>

</RelativeLayout>
Output:

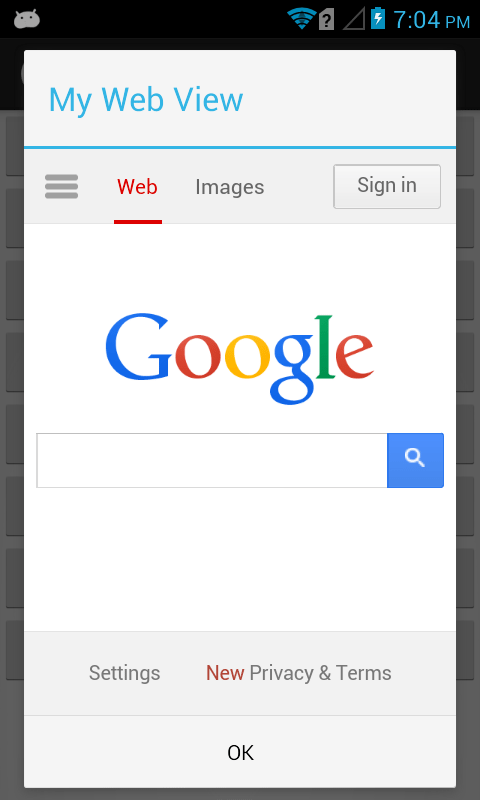
3.9 AlertDialog with WebView
You can simply specify any web page inside the WebView’s loadUrl() method.
/*
 * Show AlertDialog with web view.
 *
 * Don't forget the Internet permission on your AndroidManifest.xml
 */
public void alertWebView() {

    // WebView is created programatically here.
    WebView myWebView = new WebView(MainActivity.this);
    myWebView.loadUrl("http://google.com/");

    /*
     * This part is needed so it won't ask the user to open another browser.
     */
    myWebView.setWebViewClient(new WebViewClient() {
        @Override
        public boolean shouldOverrideUrlLoading(WebView view, String url) {
            view.loadUrl(url);
            return true;
        }
    });

    new AlertDialog.Builder(MainActivity.this).setView(myWebView)
            .setTitle("My Web View")
            .setPositiveButton("OK", new DialogInterface.OnClickListener() {
                @TargetApi(11)
                public void onClick(DialogInterface dialog, int id) {

                    dialog.cancel();

                }

            }).show();
}
Output:
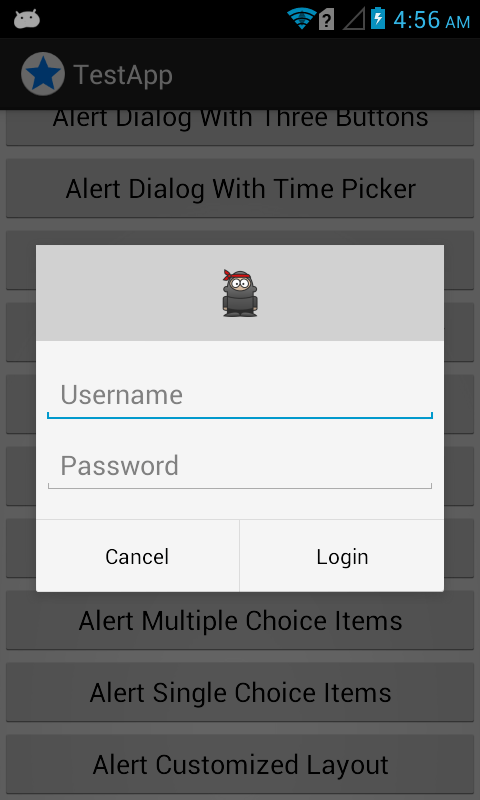
3.10 AlertDialog with Customized Layout
Used when you don’t want an AlertDialog look like the usual. Again, the key to this is to make your customized XML resource and then inflate it!
public void alertCustomizedLayout(){

    AlertDialog.Builder builder = new AlertDialog.Builder(MainActivity.this);

    // get the layout inflater
    LayoutInflater inflater = MainActivity.this.getLayoutInflater();

    // inflate and set the layout for the dialog
    // pass null as the parent view because its going in the dialog layout
    builder.setView(inflater.inflate(R.layout.login, null))

    // action buttons
    .setPositiveButton("Login", new DialogInterface.OnClickListener() {
        @Override
        public void onClick(DialogInterface dialog, int id) {
            // your sign in code here
        }
    })
    .setNegativeButton("Cancel", new DialogInterface.OnClickListener() {
        public void onClick(DialogInterface dialog, int id) {
            // remove the dialog from the screen
        }
    })
    .show();

}
res/layout/login.xml
<LinearLayout xmlns:android="http://schemas.android.com/apk/res/android"
    android:layout_width="match_parent"
    android:layout_height="match_parent"
    android:orientation="vertical" >

    <ImageView
        android:layout_width="match_parent"
        android:layout_height="64dp"
        android:background="#d1d1d1"
        android:contentDescription="@string/app_name"
        android:scaleType="center"
        android:src="@drawable/ninja" />

    <EditText
        android:id="@+id/username"
        android:layout_width="match_parent"
        android:layout_height="wrap_content"
        android:layout_marginBottom="4dp"
        android:layout_marginLeft="4dp"
        android:layout_marginRight="4dp"
        android:layout_marginTop="16dp"
        android:hint="Username"
        android:inputType="textEmailAddress" />

    <EditText
        android:id="@+id/password"
        android:layout_width="match_parent"
        android:layout_height="wrap_content"
        android:layout_marginBottom="16dp"
        android:layout_marginLeft="4dp"
        android:layout_marginRight="4dp"
        android:layout_marginTop="4dp"
        android:fontFamily="sans-serif"
        android:hint="Password"
        android:inputType="textPassword" />

</LinearLayout>
Output:
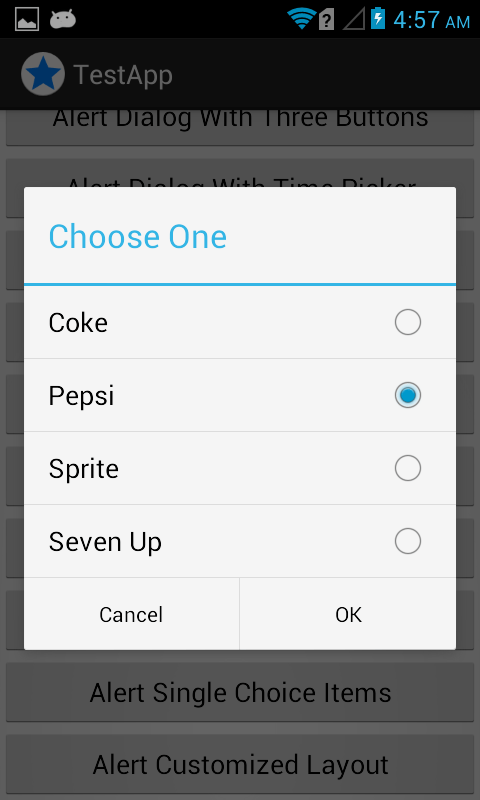
3.11 AlertDialog with Single Choice Item
Please note that we used setSingleChoiceItems() below to create the list with radio and two action buttons. You can also make it to three action buttons by adding a neutral button.
Also, a string resource was used. R.array.choices contains the items in the list, it can be found in your strings.xml. If you want to use an array adapter because you have a list from other resource such as a database, you can use this with the help of my other post.
public void alertSingleChoiceItems(){

    AlertDialog.Builder builder = new AlertDialog.Builder(MainActivity.this);

    // Set the dialog title
    builder.setTitle("Choose One")

    // specify the list array, the items to be selected by default (null for none),
    // and the listener through which to receive call backs when items are selected
    // again, R.array.choices were set in the resources res/values/strings.xml
    .setSingleChoiceItems(R.array.choices, 0, new DialogInterface.OnClickListener() {
        @Override
        public void onClick(DialogInterface arg0, int arg1) {
            showToast("Some actions maybe? Selected index: " + arg1);
        }

    })

     // Set the action buttons
    .setPositiveButton("OK", new DialogInterface.OnClickListener() {
        @Override
        public void onClick(DialogInterface dialog, int id) {
            // user clicked OK, so save the mSelectedItems results somewhere
            // or return them to the component that opened the dialog

            int selectedPosition = ((AlertDialog)dialog).getListView().getCheckedItemPosition();
            showToast("selectedPosition: " + selectedPosition);

        }
    })

    .setNegativeButton("Cancel", new DialogInterface.OnClickListener() {
        @Override
        public void onClick(DialogInterface dialog, int id) {
            // removes the dialog from the screen

        }
    })

    .show();

}
res/values/strings.xml
<resources>

    <string name="app_name">TestApp</string>
    <string name="hello_world">Hello world!</string>
    <string name="menu_settings">Settings</string>
    <string name="title_activity_main">TestApp</string>
    <string name="showTimeDialogFrom">showTimeDialogFrom</string>

    <string-array name="choices">
        <item>Coke</item>
        <item>Pepsi</item>
        <item>Sprite</item>
        <item>Seven Up</item>
    </string-array>

</resources>
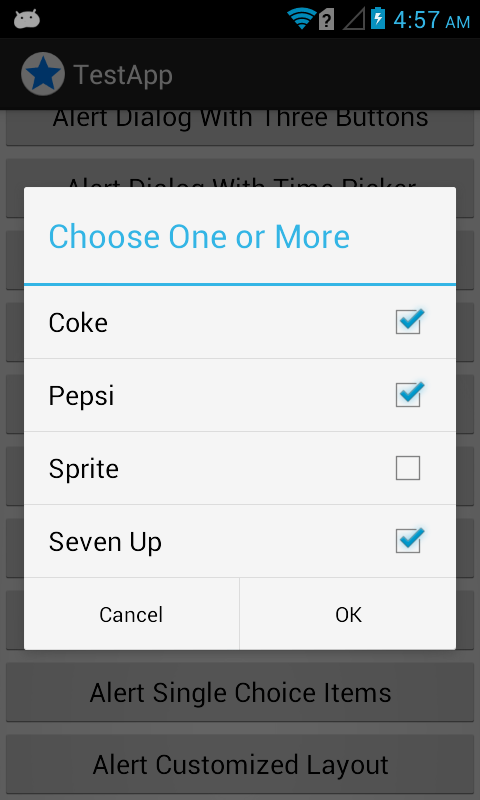
3.12 AlertDialog with Multiple Choice Item
Used for giving users a chance to pick multiple items on a list.
This time, we used the dialog builder’s setMultiChoiceItems() method but the items in the list is still the one of strings.xml. The onClick() method is responsible for adding or removing selected items which is stored in the mSelectedItems variable.
By the way, mSelectedItems variable were declared as a property variable of our class MainActivity. The AlertDialog above can be achieved with the following code.
public void alertMultipleChoiceItems(){

    // where we will store or remove selected items
    mSelectedItems = new ArrayList<Integer>();

    AlertDialog.Builder builder = new AlertDialog.Builder(MainActivity.this);

    // set the dialog title
    builder.setTitle("Choose One or More")

    // specify the list array, the items to be selected by default (null for none),
    // and the listener through which to receive call backs when items are selected
    // R.array.choices were set in the resources res/values/strings.xml
    .setMultiChoiceItems(R.array.choices, null, new DialogInterface.OnMultiChoiceClickListener() {

        @Override
        public void onClick(DialogInterface dialog, int which, boolean isChecked) {

            if (isChecked) {
                // if the user checked the item, add it to the selected items
                mSelectedItems.add(which);
            }

            else if (mSelectedItems.contains(which)) {
                // else if the item is already in the array, remove it
                mSelectedItems.remove(Integer.valueOf(which));
            }

            // you can also add other codes here,
            // for example a tool tip that gives user an idea of what he is selecting
            // showToast("Just an example description.");
        }

    })

     // Set the action buttons
    .setPositiveButton("OK", new DialogInterface.OnClickListener() {
        @Override
        public void onClick(DialogInterface dialog, int id) {

            // user clicked OK, so save the mSelectedItems results somewhere
            // here we are trying to retrieve the selected items indices
            String selectedIndex = "";
            for(Integer i : mSelectedItems){
                selectedIndex += i + ", ";
            }

            showToast("Selected index: " + selectedIndex);

        }
    })

    .setNegativeButton("Cancel", new DialogInterface.OnClickListener() {
        @Override
        public void onClick(DialogInterface dialog, int id) {
            // removes the AlertDialog in the screen
        }
    })

    .show();

}
The strings.xml used in this example is the same with the # 11.0 above.
Output:
3.13 AlertDialog with EditText and Soft-Keyboard Shown Automatically
When you have an EditText inside an AlertDialog, the EditText can be focused but it won’t show the keyboard automatically. The user has to tap the EditText first, which can be annoying.
The following code will make the Soft-keyboard automatically shown.
public void alertEditTextKeyboardShown(){

    // creating the EditText widget programatically
    EditText editText = new EditText(MainActivity.this);

    // create the AlertDialog as final
    final AlertDialog dialog = new AlertDialog.Builder(MainActivity.this)
        .setMessage("You are ready to type")
        .setTitle("The Code of a Ninja")
        .setView(editText)

         // Set the action buttons
        .setPositiveButton("OK", new DialogInterface.OnClickListener() {
            @Override
            public void onClick(DialogInterface dialog, int id) {

            }
        })

        .setNegativeButton("Cancel", new DialogInterface.OnClickListener() {
        @Override
        public void onClick(DialogInterface dialog, int id) {
            // removes the AlertDialog in the screen
            }
        })
        .create();

    // set the focus change listener of the EditText
    // this part will make the soft keyboard automaticall visible
    editText.setOnFocusChangeListener(new View.OnFocusChangeListener() {
        @Override
        public void onFocusChange(View v, boolean hasFocus) {
            if (hasFocus) {
                dialog.getWindow().setSoftInputMode(WindowManager.LayoutParams.SOFT_INPUT_STATE_ALWAYS_VISIBLE);
            }
        }
    });

    dialog.show();

}
Output:

3.14 Preventing AlertDialog from Closing when a Button is Clicked
Commonly used when your AlertDialog have some sort of validation. It is a default behaviour of an AlertDialog to be closed when one of its action button was clicked. To prevent that, we have to make it persistent by overriding the DialogInterface.
See the following very useful piece of code.
public void alertPersistentDialog(){

    final AlertDialog alertDialog = new AlertDialog.Builder(MainActivity.this)
        .setTitle("The Code of a Ninja")
        .setMessage("This is a persistent AlertDialog")
        .setPositiveButton("Show Toast", null) // null to override the onClick
        .setNegativeButton("Dismiss", null)
        .setCancelable(false)
        .create();

    alertDialog.setOnShowListener(new DialogInterface.OnShowListener() {

        @Override
        public void onShow(DialogInterface dialog) {

            Button btnPositive = alertDialog.getButton(AlertDialog.BUTTON_POSITIVE);
            btnPositive.setOnClickListener(new View.OnClickListener() {

                @Override
                public void onClick(View view) {

                    showToast("Dialog not dismissed!");

                }
            });


            Button btnNegative = alertDialog.getButton(AlertDialog.BUTTON_NEGATIVE);
            btnNegative.setOnClickListener(new View.OnClickListener() {

                @Override
                public void onClick(View view) {

                    // dismiss once everything is ok
                    alertDialog.dismiss();
                }
            });
        }
    });

    // don't forget to show it
    alertDialog.show();

}
Output:

4.0 Tips and Suggestions
If you want to add more views or widgets inside an Android AlertDialog, you can just simply inflate it. You can use the code examples above as your reference.
If you want to see the complete code of the project, I recommend downloading the whole source code. There you can see not only the MainActivity but also the layout resources, string resources and the AndroidManifest.xml, the code examples above were just for our quick reference.
Should you want to add your awesome Android AlertDialog example in this list, you can just submit it to my email ninjazhai30(at)gmail(dot)com
5.0 Links and Literature
5.1 Source Code Downloads
You can get the source code by following the whole, well detailed and free tutorial above. But isn’t it more convenient if you can just download the complete source code we used, and play around it?
There’s a small fee in getting the complete source code, it is small compared to the:
| ✔ Value or skill upgrade it can bring you, or | YES |
| ✔ Income you can get from your website project or business. | YES |
| ✔ Precious time you save. | YES |
5.2 Android AlertDialog Online Resources
Android AlertDialog Class
Android Dialogs
Building an AlertDialog from the Official Android Docs
How to create a Dialog without a title?
How to change theme for AlertDialog?
How to show AlertDialog in any position of the screen?
If you think we missed any essential Android AlertDialog.Builder Example, please tell us by dropping a comment below! We want this list to be a one stop page or reference for these types of example codes. Thanks!
29 responses to “14+ Android AlertDialog.Builder Example Codes and Output”
thnk u……..
You’re welcome… :)
thx :)
this helped! thanks
very much useful.. thanks…
yes
Great stuff:). Thanks for sharing it. You have a great skill on Web Development.
@Janz: Thanks man! But this is an Android development post.
Nice!
Glad you appreciate it @shafficjan:disqus! Thanks!
3.6 AlertDialog With Simple ListView, any way to disable any entry?
Hi @disqus_UewjzPq6jN:disqus , sorry for the late reply but regarding your question, I think the code above will not work for your requirement, the alternative is using an android custom listview with adapter, see my other posts regarding those things here http://www.codeofaninja.com/2013/02/android-listview-tutorial.html and here http://www.codeofaninja.com/2013/09/android-listview-with-adapter-example.html
I find this very helpful… thank you! :)
Glad you found it very helpful @Jevie! Please share it to your friends!
Hello and thanks for your work! Very useful! :-))) A question: using “3.11 AlertDialog with Single Choice Item” how pass variable arg1 (the value choosen) to main class? Thanks
Pol
Hey @pol_hallen:disqus, you can make a class variable and inside the dialog onClick() would be YourMainClass.this.yourVariable=arg1;
I tried using this wonderful resource class other than the MainActivity. I have different screens for different user activities. When I try to create the builder.setItems(items, new DialogInterface.OnClickListener() I keep getting an error indicating that I have not called Looper.prepare(). What is the proper way to use this Alerts in a class other the MainActivity?
Hey @joe_carl:disqus, you would want to run the alert dialog inside the ui thread:
activity.runOnUiThread(new Runnable() {
public void run() {
// put alert dialog here
}
});
you can also post your code here so we can try to debug it better..
Thank you very much for replying.
I’m going to show you code I’m using from the relevant parts. I think I am misunderstanding something in a big way!! I’m still new at Android programming and trying to develop a prototype game using a book called “Beginning Android Games” by Zechner & Green
this is pretty easy code to follow I hope.
The main activity is a from an abstract class that sets up the guts of the game engine.
AndroidGame is the abstract class
WizMGame uses it and calls various screen for the user to interact with. All works well, until I need some user input from a menu selection that I try to pop up.
Importantly AndroidGame has a member class AndroidFastRenderView which implements runnable that processes Update() and Present()
*******************************
public abstract class AndroidGame extends Activity implements Game { private static final String LOG = “AndroidGame”;
AndroidFastRenderView renderView;
Graphics graphics;
Audio audio;
Input input;
FileIO fileIO;
Screen screen;
WakeLock wakeLock;
@SuppressWarnings(“deprecation”)
@Override
public void onCreate(Bundle savedInstanceState) { super.onCreate(savedInstanceState);
requestWindowFeature(Window.FEATURE_NO_TITLE); getWindow().setFlags(WindowManager.LayoutParams.FLAG_FULLSCREEN, WindowManager.LayoutParams.FLAG_FULLSCREEN);
boolean isLandscape = getResources().getConfiguration().orientation
== Configuration.ORIENTATION_LANDSCAPE;
int frameBufferWidth = isLandscape ? 800 : 480; // Most common
Droid Screen
int frameBufferHeight = isLandscape ? 480 : 800;
Bitmap frameBuffer = Bitmap.createBitmap(frameBufferWidth, frameBufferHeight, Config.RGB_565);
Point size = new Point(); getWindowManager().getDefaultDisplay().getSize(size);
float scaleX = (float) frameBufferWidth / size.x;
float scaleY = (float) frameBufferHeight / size.y;
renderView = new AndroidFastRenderView(this, frameBuffer);
graphics = new AndroidGraphics(getAssets(), frameBuffer);
fileIO = new AndroidFileIO(getAssets());
audio = new AndroidAudio(this);
input = new AndroidInput(renderView, scaleX, scaleY);
screen = getStartScreen();
setContentView(renderView);
PowerManager powerManager = (PowerManager) getSystemService(Context.POWER_SERVICE);
// Use a wake lock only when loading through the network
wakeLock =
powerManager.newWakeLock(PowerManager.SCREEN_DIM_WAKE_LOCK, “loading”); // Deprecated but shouldn’t be.
}
*******************************
public class AndroidFastRenderView extends SurfaceView implements Runnable { public static final String LOG = “AndroidFastRenderView”;
AndroidGame game;
Bitmap framebuffer;
Thread renderThread = null;
SurfaceHolder holder;
volatile boolean running = false;
public AndroidFastRenderView(AndroidGame game, Bitmap framebuffer) { super(game);
this.game = game;
this.framebuffer = framebuffer;
this.holder = getHolder();
Log.i(LOG, “Thread name is ” + Thread.currentThread().getName());
}
public void run() {
Rect dstRect = new Rect();
long startTime = System.nanoTime();
Log.i(LOG, “Thread name in Render Run is ” + Thread.currentThread().getName());
Looper.prepare();
while(running) {
if(!holder.getSurface().isValid())
continue;
float deltaTime = (System.nanoTime()-startTime) / 1000000000.0f; startTime = System.nanoTime();
game.getCurrentScreen().update(deltaTime); game.getCurrentScreen().present(deltaTime);
Canvas canvas = holder.lockCanvas();
canvas.getClipBounds(dstRect);
canvas.drawBitmap(framebuffer, null, dstRect, null);
holder.unlockCanvasAndPost(canvas);
}
}
*******************************
public class WizMGame extends AndroidGame {
wmWorld world;
public Screen getStartScreen() {
//world = new wmWorld(); // No context at all DB fails
//world = new wmWorld(getApplicationContext()); // Forced close — wrong context
world = new wmWorld(this);
return new LoadingScreen(this);
}
public wmWorld getWorld() {
return this.world;
}
}
*******************************
/*
* I’ve stripped out the unimportant stuff to highlight where I encounter the problem
* you will notice that the Screen receives the proper activity context *
*/
public class MinionScreen extends Screen {
private String LOG = “MinionScreen”;
wmWorld world;
boolean bHomeDown = false;
public static enum KobaldButton {NONE, ONE, TWO, THREE}
KobaldButton kButton = KobaldButton.NONE;
boolean bkStart = false;
boolean kButtonDown = false;
boolean bPlaceKobald = false;
boolean bHighlightEmpty = false;
public MinionScreen (Game game) {
super(game);
Log.i(LOG, (String) “get world”);
this.world = game.getWorld();
//this.world.loadWorld();
Log.i(LOG, (String) “get world successful”);
for (int i=0; i<this.world.wizard.cSpells.size(); i++) {
String spellName = this.world.wizard.cSpells.get(i).getSpell();
if (spellName.equalsIgnoreCase(ConjureSpellTable.KOBALD)) {
switch (this.world.wizard.cSpells.get(i).getLevel()) {
case 1:
kButton = KobaldButton.ONE;
break;
case 2:
kButton = KobaldButton.TWO;
break;
case 3:
kButton = KobaldButton.THREE;
break;
default:
break;
}
} // Other minions here
}
}
public void update(float deltaTime) {
List touchEvents = game.getInput().getTouchEvents(); game.getInput().getKeyEvents();
for (int i =0; i < world.minionLands.NUM_HEXES; i++) { world.minionLands.minions[i].timer.update(deltaTime);
}
int len = touchEvents.size();
for (int i=0; i<len; i++) {
TouchEvent event = touchEvents.get(i);
switch (event.type) {
case TouchEvent.TOUCH_DOWN:
case TouchEvent.TOUCH_DRAGGED:
if (event.type == TouchEvent.TOUCH_DRAGGED)
Log.i(LOG, "Event Dragged");
else
Log.i(LOG, "Event Down");
for (int j =0; j 32) && (event.x 704) && (event.y 384) && (event.x 704) && (event.y < 768)) {
// if it's a down even and in the KobaldButton – save this fact
if (event.type == TouchEvent.TOUCH_DOWN)
Log.i(LOG, "Kobald Start");
bkStart = true;
// If the KobaldButton was pressed, instead of dragged into
if (bkStart)
Log.i(LOG, "Kobald Button Down");
kButtonDown = true;
}
else
kButtonDown = false;
}
break;
case TouchEvent.TOUCH_UP:
Log.i(LOG, "Event Up");
for (int j =0; j 32) && (event.x 704) && (event.y 384) && (event.x 704) && (event.y < 768)) {
Log.i(LOG, "Place a Kobald, start highlights");
bPlaceKobald = true;
bHighlightEmpty = true;
} else {
Log.i(LOG, "Clear Placing Kobald, stop highlights");
bPlaceKobald = false;
bHighlightEmpty = false;
}
} else {
Log.i(LOG, "Not started – clear flags");
bkStart = false;
bHighlightEmpty = false;
bPlaceKobald = false;
}
} else {
Log.i(LOG, "No Kobald Buttion should call this!");
}
break;
}
}
}
Hi Mike, amazing examples of the alert dialog, thank you for also including the output. I am using 3.12 AlertDialog with Multiple Choice Item and 3.13 AlertDialog with EditText and Soft-Keyboard Shown Automatically. I see everything working great, but I want to be able to see and display the User’s selections (3.12) and the EditText (3.13) input into another activity. For example, User selects (3.12) Coke and Pepsi and inputs (3.13), “I love drinking soda 24/7.” I want to capture those responses and display for that User into let’s say the User’s profile, which the User and others can view. I plan to create a UserProfileActivity showing the cumulative of the input. User should be able to change as often and the User’s profile would update based on those changes.
Any guidance you can provide is greatly appreciated. Thank you!
Hello NC, thanks for the kind words and appreciating our post!
If you want to preserve your user selection and use it in another screen or activity of you app, you can use SharedPreferences for that. See our tutorial here https://www.codeofaninja.com/2012/01/android-sharedpreferences-example.html
You can also store it to a temporary database https://www.codeofaninja.com/2013/02/android-sqlite-tutorial.html
Or to a text file https://www.codeofaninja.com/2013/01/working-with-text-files-in-android.html
Hi Mike, thank you for your links! I am going to explore SharedPreferences and storing to a temporary database. Ill read the codes and let you know if I have any more questions. Thanks again!
i want to have AlertDialog with Single Choice Item with no buttons and i want my radio buttons to have picture instead of simple view of radio button
i could make it by creating a new class and new xml file but when i click each picture no value returns to main activity that i can make changes to my activity base on this select
Awesome post man, thanks for sharing
i m doing doctor app and i want to use alert dialog single choice item click if any item click and press Okay button it should set text in edit text with some details like template but i m new to developer so please help me in this situation…
thanks..
Actually I have a question. if in case in alert dialog box i wanna take a path from user and after clicking on ok (positive) button i want that this path is used as a url of a server. I tried this but I’m getting null reference because when I’m passing this path to url it’s taking null value that is before taking input of path from user it’ll executing the below code. Please help me as soon as possible.
thanks in advance.
thx,useful for me!
Still using this site !!!
Good to know, thank you! :)