When you created a new Blogger Blog, you will see the blogger.com navigation bar at the top of your blog site.
New Blogger Blog
But sometimes, for blog design purposes, you would want to remove it. To do it, follow the following simple steps:
*Note: "Template Designer" is a new feature of blogger.com that lets you make or design your own blog template easier. And one of its advanced options is the "Add CSS" that lets us insert our own CSS code.
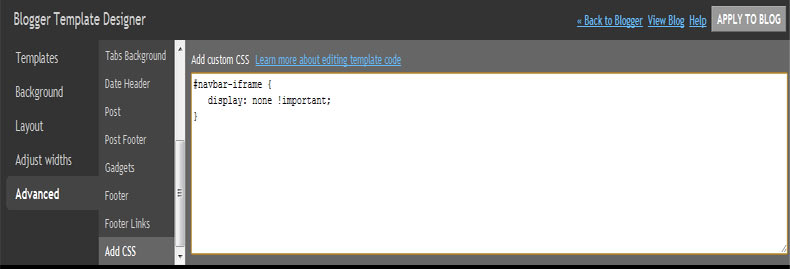
Step 1: Go to your Dashboard -> Design -> Template Designer -> Advanced -> Add CSS
Step 2: Paste The follwing Codes:
You should be in this section of Blogger Template Designer (Please Click To Enlarge)
#navbar-iframe {
     display: none !important;
}
Step 3: Click the "APPLY TO BLOG" button on the upper right corner of the Template Designer. That's it! Thanks for reading! :)
https://www.codeofaninja.com/wp-content/uploads/2019/03/codeofaninja-with-text-3-1030x206.png00Mike Dalisayhttps://www.codeofaninja.com/wp-content/uploads/2019/03/codeofaninja-with-text-3-1030x206.pngMike Dalisay2011-02-15 10:32:002021-07-26 11:36:41How To Remove Blogger Navigation Bar on you Blogger Blog
It is good to see when your website has "Favicon". It is an icon image seen on the browser's tab when your site is viewed. It adds some good vibes and identity to your site. It also provides a professional look for your website and can help improve its brand.
Favicons
Before, I feel lazy creating favicons for those sites that I make. Now we have these free online favicon makers. Below is the list of top favicon generator that I like.
Faviconer - Faviconer.com, or favicon generator, is online tool for creating favicon.ico icons for your websites.
Favicon.cc - favicon.cc is a tool to create or download favicon.ico icons, that get displayed in the address bar of every browser.
Favicon-Generator.org - Favicon Generator provides an easy way to convert and GIF, PNG or JPEG to ICO which is supported by all modern web browsers. It also enables you to create favicons from scratch via a handy online editor.
FaviconGenerator.com - Create free favicon.ico page icons with Favicon Generator, instantly make custom Favicons for your website.
AntiFavicon.com - Favicons generated here contain text instead of images in order to be descriptive, but are colored to be nice looking.
Favicon Generator and Gallery - Create favicon.ico files to customize the marketing logo in Internet Explorer's favorites/bookmarks using this free online tool.
GenFavicon - The most common sizes for favicons are: 16x16, 32x32, 48x48, 64x64, 128x128. Browse to the files location on your computer to select the image and press Upload Image button to generate a favicon for your site.
FreeFavicon - Generate a free favicon for your website from an image, you can also specify scrolling text.
You can add favicons to your site by adding a line of code in the head section of your HTML. For example:
Hi there! Today we'll be sending email using PHPMailer Library and your Gmailaccount. This code works even if you test it on your local machine (localhost) since the mailer server it uses is the Google mail server. You just have to be connected on the internet and you don't have to install your own mailer server haha!
<?php
require("class.phpmailer.php");
$mailer = new PHPMailer();
$mailer->IsSMTP();
$mailer->Host = 'ssl://smtp.gmail.com';
$mailer->Port = 465; //can be 587
$mailer->SMTPAuth = TRUE;
// Change this to your gmail address
$mailer->Username = '[email protected]';
// Change this to your gmail password
$mailer->Password = 'yourpassword';
// Change this to your gmail address
$mailer->From = '[email protected]';
// This will reflect as from name in the email to be sent
$mailer->FromName = 'Your Name';
$mailer->Body = 'This is the body of your email.';
$mailer->Subject = 'This is your subject.';
// This is where you want your email to be sent
$mailer->AddAddress('[email protected]');
if(!$mailer->Send())
{
    echo "Message was not sent<br/ >";
    echo "Mailer Error: " . $mailer->ErrorInfo;
}
else
{
    echo "Message has been sent";
}
?>
If you want to add some attachments, just add a line something like this:
https://www.codeofaninja.com/wp-content/uploads/2019/03/codeofaninja-with-text-3-1030x206.png00Mike Dalisayhttps://www.codeofaninja.com/wp-content/uploads/2019/03/codeofaninja-with-text-3-1030x206.pngMike Dalisay2011-01-25 03:26:002021-07-26 11:56:35How To Send Email Using PHPMailer and GMail
Someone asked me how to make a webpage. An HTML document is the most basic thing in making a webpage. So here's its basic structure.
Step 1: Create an index.html file. It should have the following codes.
HTML
<html>
     <head>
          <title><!--here is where your page title goes--></title>
         <!--here is where your css code/link goes-->
     </head>
<body>

     <!-- here is where your page content goes -->

     Just a sample content

     <!-- here is where your javascript goes
         (before, it is usually in the <head> section, but for better page
         performance, JavaScripts are coded at the bottom part of the page***.)
    -->
</body></html>
You should see "Just a sample content" text in your web browser when you run this. Then for HTML5, the same principles apply, it's just there are more on it.
HTML5
<!DOCTYPE HTML>
<html>
    <head>
        <meta http-equiv="Content-Type" content="text/html; charset=UTF-8" />
        <title>Your Website</title>
    </head>
<body>

    <header>
        <nav>
            <ul>
                <li>Menu Option 1</li>
                <li>Menu Option 2</li>
            </ul>
        </nav>
    </header>

    <section>

    <article>
        <header>
            <h2>Content Title</h2>
            <p>Posted on <time datetime="2003-01-01T16:31:24+02:00">January 1st, 2013</time> by <a href="#">Mike</a> - <a href="#comments">173 comments</a></p>
        </header>
        <p>Some content of the article here.</p>
    </article>

    </section>

    <aside>
        <h2>The Blogger</h2>
        <p>This is your side bar. You can add your information or links here.</p>
    </aside>

    <footer>
        <p>Copyright 2013 - Your name</p>
    </footer>

</body>
</html>
Beginners may need this one. See more at W3Schools. Latest and more advanced HTML5. Thanks for reading! :)
https://www.codeofaninja.com/wp-content/uploads/2019/03/codeofaninja-with-text-3-1030x206.png00Mike Dalisayhttps://www.codeofaninja.com/wp-content/uploads/2019/03/codeofaninja-with-text-3-1030x206.pngMike Dalisay2011-01-01 12:26:002021-07-26 12:03:00Basic Structure Of An HTML5 Document
I wonder why its hard to find this tutorial on the web. So I decided to make my own. This snippet is useful if you’re editing data in the greybox pop up window and then you want to reflect the changes in its parent window by refreshing it.
In case you want to test this code instantly, you may download the code or see the result of this tutorial live:
Step 1: Download Greybox here and place it inside you js/ directory.
Step 2: Create your index.php file, with these codes inside:
<html>
     <head>
          <title>How To Refresh Greybox Parent Page</title>

          <script type="text/javascript">
               var GB_ROOT_DIR = "js/greybox/";
          </script>

          <script src="js/greybox/AJS.js" type="text/javascript">
          </script>
          <script src="js/greybox/AJS_fx.js" type="text/javascript">
          </script>
          <script src="js/greybox/gb_scripts.js" type="text/javascript">
          </script>
          <link href="js/greybox/gb_styles.css" rel="stylesheet" type="text/css">

          <script language="javascript" type="text/javascript">
               // we will use greybox' afterclose function to reload the parent page
               // after closing the grebox pop up window
             <!--
                    function afterclose() {
                         window.location.reload();
                    }
               // -->
          </script>

     </head>
<body>

     <b>This is the greybox parent window</b>
     <p>
          <a href="greybox_pop_up.php" title="Greybox pop up" rel="gb_page_center[500, 500]">
               Click this link to greybox pop up
          </a>
     </p>

     Textbox with default input:
     <input name="sample_textbox" size="40" type="text" value="some predefined value" />

</body>
</html>
Step 3: Create your greybox pop up page which is greybox_pop_up.php with these codes inside:
<html>
     <head>
          <title>This is the greybox pop up</title>
          <script type='text/javascript'>
          function redirect_to_parent(){
               parent.parent.window.location = "index.php";
               parent.parent.GB_hide();
          }
          </script>
     </head>
<body onunload="redirect_to_parent();"> <-- The important part -->


     <h2>This is the greybox pop up window</h2>
     <form>
          <input type="button" value="Close This Window" onclick="parent.parent.GB_hide();">
     </form>


</body>
</html>
Step 4: You should have this files by now:
Final files in this tutorial
Step 5: Testing
If you’re gonna run index.php, you should see this in your browser:
Our index.php file
Change the predefined textbox value to any values you want, like the following:
Textbox with changed predefined value
Click the link to show the greybox pop up
Greybox pop up window
Close the pop up window, if the textbox value returned to “some predefined value”, it means that the parent page was refreshed.
By the way, if you’re not yet familiar with greybox, I also have a tutorial on how to use greybox. That’s it! Hope it helps :)
https://www.codeofaninja.com/wp-content/uploads/2019/03/codeofaninja-with-text-3-1030x206.png00Mike Dalisayhttps://www.codeofaninja.com/wp-content/uploads/2019/03/codeofaninja-with-text-3-1030x206.pngMike Dalisay2010-12-19 15:34:002021-12-02 03:06:59How To Refresh Greybox Parent Page
If you're feeling lazy right now to create your own hashing algorithm (like me haha!), here's one of best built in hashing algorithm with its new feature in PHP5 - SHA1. It uses US Secure Hash Algorithm 1. I didn't hear any successful hacking attempts or tools for sha1 yet. (If you have, please pm me or comment to this post! thanks... ) Unlike for MD5 hashing, there are successful hacking attempts discovered.
HOW TO's*Comments on codes serves as its explanation
Put the following PHP code in your index.php file.
<?php
$str = 'dalisay'; // we're gonna hash this string

echo sha1( 'dalisay' ); // to be seen on the page

echo nl2br("nn"); // just some line breaks

// in this part, we're just gonna test if sha1 is working in your server
// the random number and digits is the hash code for string 'dalisay'
// the condition for a login system with sha1 passwords goes like this
if ( sha1( $str ) == '49d8801436095c7a0445a3c53c7d31270223069c' ){
    echo "Yes";
}else{
    echo "No";
}
?>
Step 2: Testing. If you end up something like this, sha1 is working fine.
Final output for the codes above
TIPsIf you're going to use sha1 for passwords to be stored in the database, make the datatype of your password field to BLOB type, just to make it more secure. :)
<b>This is the greybox parent window</b> <p> <ahref="greybox_pop_up.php"title="Greybox pop up"rel="gb_page_center[500, 500]"> Click this link to greybox pop up </a> </p>
</body> </html>
Step 4: Create your greybox_pop_up.php with these codes in it:
<html>
     <head>
          <title>This is the greybox pop up</title>
     </head>
<body>
     <h2>This is the greybox pop up window</h2>
</body>
</html>
Step 5: Run your index.php, click the link to test if greybox is working.
our index.php
Greybox pop up after clicking the "Show greybox pop up link"
Tips.
You can do many things with greybox. It prevents you from the hassle of refreshing the whole page.
https://www.codeofaninja.com/wp-content/uploads/2019/03/codeofaninja-with-text-3-1030x206.png00Mike Dalisayhttps://www.codeofaninja.com/wp-content/uploads/2019/03/codeofaninja-with-text-3-1030x206.pngMike Dalisay2010-12-16 09:35:002021-07-26 12:50:37How To Use Greybox
Z-Index property is like a layering system for CSS. It helps a lot when it comes to organizing elements on a web page.Today I'm gonna show you a simple example use of the CSS Z-index property.At the end of this tutorial, we will have th following output:
The CSS Z-index property
Step 1: Prepare two sample images and place it inside your images folder.Step 2: Create your index.html file. We should have these codes.
Step 2: Create your index.html file. We should have these codes.
<html>
     <head>
          <title>Z Index</title>

          <style type="text/css">
               /* it will load the image with red border */
               .image1 {
                    position: absolute;
                    background-image:url("images/image1.jpg");
                    top: 0px;
                    left: 0px;
                    width: 100px;
                    height: 100px;
                    border: thin solid red;
                    z-index: 1;
               }

               /* it will load the image with blue border */
               .image2 {
                    position: absolute;
                    background-image: url("images/image2.jpg");
                    top: 20px;
                    left: 20px;
                    width: 100px;
                    height: 100px;
                    border: thin solid blue;
                    z-index: 2; /* the higher value would be in front */
               }
          </style>
     </head>
<body>
      <div class='image1'></div>
      <div class='image2'></div>
</body>
</html>
Step 3: If you want the image with red border to be on top, just make that z-index value of image1 class higher than the value of image2 class. For example: z-index: 3;We will come up with this:


